


Learn a new budget friendly way to do DIY Paint Pouring! This is one of the most popular and trending craft projects, and it’s great for kids. It is so much fun to watch and even more fun to try.
Many crafters use acrylic paint for their paint pouring projects. We recommend using tempera paint as a less expensive version, especially if you choose to do this activity with a large group of kids for a craft station in your program. It gives you the same effects as acrylic paint at half the cost. We also use washable tempera so it won’t stain kids hands or clothes!
In this tutorial, we will show you a few different paint pouring projects with basic supplies, as well as tips and information. Watch as the paint colors mix and swirl together to create a unique design on the canvas each time.

Shop Our Best Selling Supplies
Materials List:
- Canvas panels
- Liquid Tempera Paint
- Clear glue
- Cups
- Paint bottles
- Art trays
- Pencil (for spreading design)
- Water
Paint Pouring Tutorial
Video:
Instructions:
Step 1: Mix glue, water, and liquid tempera paint into a squeeze bottle. Fill the bottle about 1/4 with glue, then add a few splashes of water, then fill the rest of the bottle with one color of tempera paint. Repeat for each color. Shake the bottle well.
Step 2: Squeeze alternating layers of each tempera paint color into your paint cup. For example, first add some blue, then red, then yellow, then pink. You can choose any color combinations you’d like.
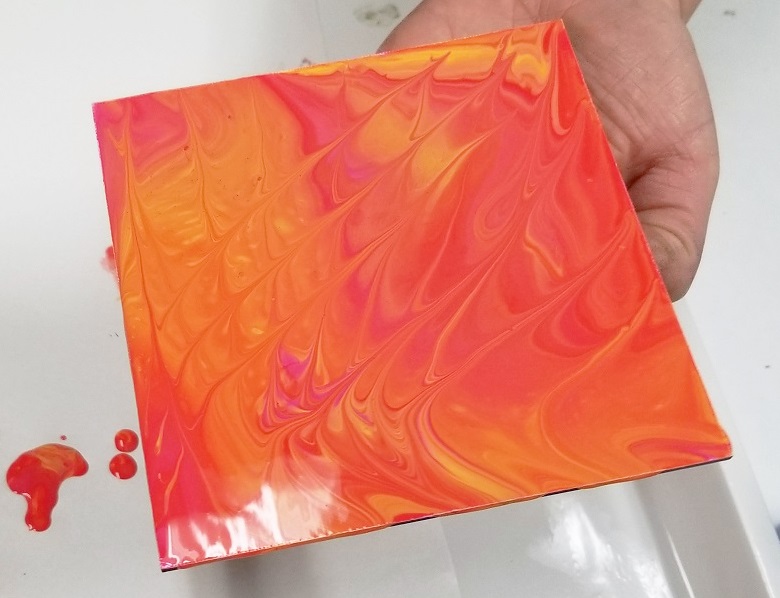
Step 3: Place your canvas over the top of the paint cup, then flip the cup upside down and remove it from the canvas so the colors pour onto the canvas. Tilt the canvas slowly and watch the colors cover the surface.
Step 4: Let your canvas dry. It may take 24 hours for the paint to completely dry because of the amount of paint on the canvas.
You can try this with any sized canvas! View our favorite options here.

Important Tips for Paint Pouring
- You must add water and glue to the tempera paint before starting your paint pouring. This dilutes the paint so it flows on the canvas.
- We recommend using easy squeeze bottles for kids so they don’t spill.
- The color you squeeze into the paint cup first will likely be the most dominant on your canvas.
- Aim for about 1.5 – 2 inches of paint colors layered in the cup. You can make the layers as thick or thin as you’d like in the paint cup.
- To add even more design, create a marbeling look while the paint is still wet with the tip of a pencil.
- We recommend using an art tray to contain the mess when the paint pours off of the canvas.
- It is best to elevate the canvas up off of your tray so the colors can flow off of the edges and you can easily pick it up after. Our watercolor cups work great for this.
- Tempera paint dries very matte – it will not be shiny. You can coat it with a layer of Mod Podge after it is dry to give it a shiny look.
Alternative Paint Pouring Method

We have found that kids love this version of paint pouring because they get to spend more time pouring the paint onto the canvas and create their own designs and color patterns. It is also a slower process to watch the paint pour.
Step 1: Spread black tempera paint onto your canvas with a paint scraper or thick card. Be sure the layer is fairly thick and the canvas is covered. This black layer will give the colorful paint in step 2 a barrier so it doesn’t run off of the canvas.
Step 2: Squeeze your glue, water, and paint mixture onto the canvas using any design you’d like. Layer the colors on top of one another for best results.
Step 3: Move the canvas from side to side and watch the paint slowly move. Add some design with a pencil if you’d like.
We hope you enjoy exploring paint pouring with tempera paint! We love this project because it keeps kids engaged and every single pour comes out different.


I wonder if you could substitute the Elmer’s for a non-toxic polyurethane sealant so that it dries shiny? I discovered your page when researching mixing Elmer’s with tempera because I really hate the chalkiness of tempera when it dries. It gives me the heebie jeebies (spelling?) and it’s so messy!
What size canvas are you using and what size cup?
Hi Melissa, you can use any size canvas for this project. This is a link to all of our canvas options: https://www.ssww.com/arts-and-crafts-supplies/paper/canvas/. If you want a square project, these 5×5 panels are great, they also come in 4×6 and are a great price https://www.ssww.com/item/color-splash-value-canvas-small-panels-PE2240G/. The cup can be any size, it is just to hold the paint so you can mix the colors and pour it out.
Thank for for all the instructions! I really enjoy your blog and the art projects. This is the best I have found online! I am a retired K-5 art teacher and am a volunteer art instructor now. The kids will really love these! Will use the puffy paint project as well. Thanks again!
Pingback: 20 Fun And Colorful Painting Ideas For Kids - Teaching Expertise
Thanks for the great instructions and tips. In the information recipe you never mention the size of bottle to use when mixing the glue, water and tempera paint??? Also, can uou use the craft smart white glue instead of clear glue?
Since glue is added to the Tempera paint then sealed with Modge Podge when dryed. Can this paint be used on rocks? Then, spray with a clear gloss. Would it hold up to weather?
I think it might. But usually acrylic is best for rocks.
Pingback: 30 Unique and Creative Painting Ideas for Kids | WeAreTeachers
Pingback: Paint Pouring, Spin Art, and Other Unique Painting Ideas for Kids - NWS100
Pingback: Paint Pouring, Spin Art, and Other Unique Painting Ideas for Kids | BULLETINr
Pingback: 30 Unique and Creative Painting Ideas for Kids | NewsWesn
Pingback: Get Crafty with Giotto! - Diskonto Stationers George
Can you add either alcohol, or zilicone drops to tempera paint to make cells?
Pingback: 7 Supplies Every Activity Director Needs to Keep on Hand - S&S Blog
I am looking for activities/projects that Senior Citizens would enjoy. Do you have any suggestions??
Thanks!!
Tae
Hi Taesha, have you seen the Senior Activities category on our blog? Here is the link https://www.ssww.com/blog/category/senior-activities/. You will find activities for holidays, observances, seasonal, crafts, games, and many other activity ideas! Let me know if you are looking for anything in particular. Thanks!