

Nature art is an easy way to get outside and explore the natural world around you and your creative side all at once! Experiment with making nature art prints using common plants from your yard, basic paper and tempera paint.
Use this straightforward “Paint & Press” process to get great results, fast! The instant gratification & the element of surprise makes this nature activity extra fun for everyone.
Materials Needed:
- Freshly gathered collection of plants
- Color Splash Tempera Paint
- Paint Palette or Paper plates
- Soft Bristle Paint Brush
- Art Paper– a thin smooth surface paper works best
- Scrap Cardboard or Kraft Board
- Scrap paper or newspaper
- Cups of water/paper towels

Take a walk outside to gather a collection of different types of leaves, ferns and other plants to experiment making a variety of nature prints with following the 4 easy steps below! I have found that small ferns and other delicate plants need to be used right away before they start to wilt. Larger ferns and leaves held up the best. So gather your nature specimens right before your ready to start this activity.
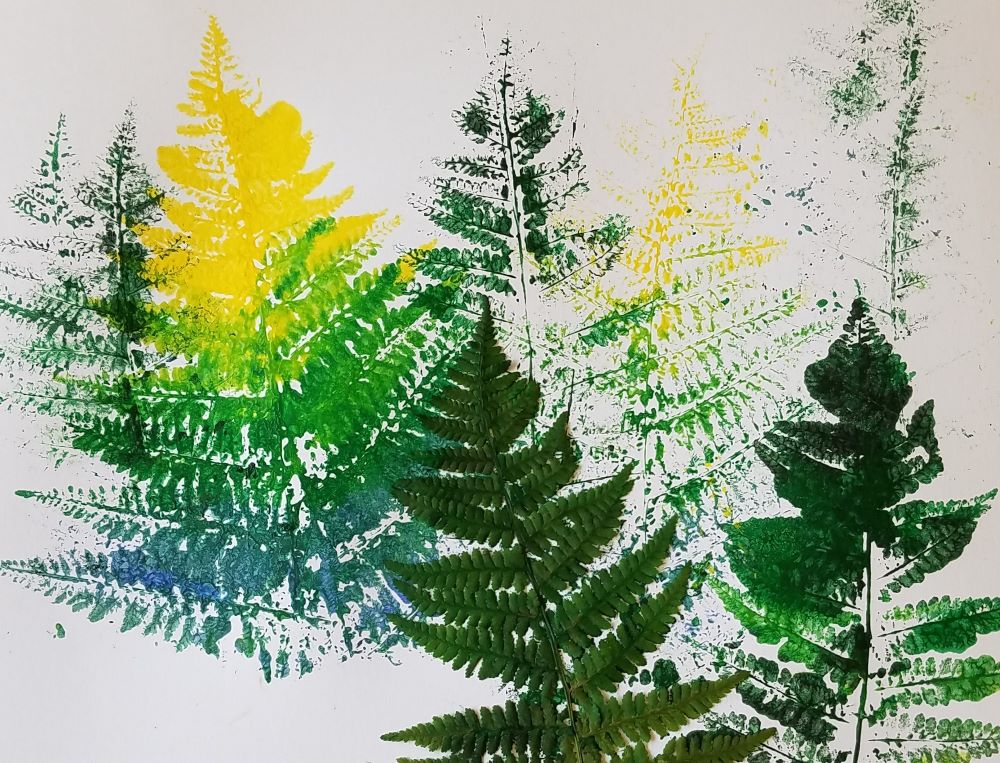
Step 1: Use a soft brush to paint directly on the plant. I limited my color palette to just blue, green and yellow to keep the prints looking fresh.
(NOTE: Sometimes when you give kids the entire rainbow of colors to use, their finished artwork can get brown and muddy looking.)

Step 2: Use a soft brush & water based paint (I used Color Splash Tempera) to paint directly on the plants you gathered outside. I used a piece of natural cardboard as a working surface to do the actual painting on. This sometimes turn into a work of art itself!
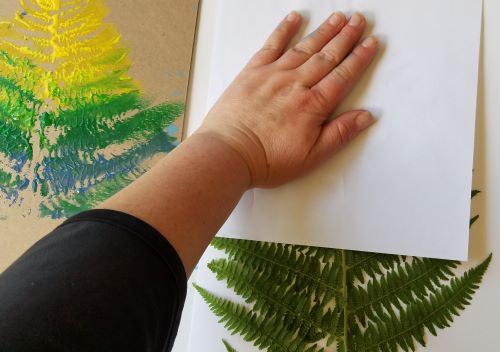
Step 3: Next, carefully place your plant with the painted side down on top of a clean piece of smooth art paper. Place a scrap piece of paper or old newspaper over the back of the painted plant and use your hand to firmly press the painted plant onto the paper creating a nature print.

Step 4: Remove the protective paper backing and carefully lift the plant off the paper to reveal your first nature print. You can make a second impression using the same plant to press the remainder of the paint off onto your paper creating what printmakers would call a “ghost print” or the second lighter print. You can see the different layers I built up to create an interesting effect below making two impressions from each coat of paint.

I found that the larger ferns held up much better than the smaller more delicate ones. I also noticed the back side of the ferns absorbed a lot more paint than the front side of the ferns that seem to have a water resistant surface. The back of the ferns were great for allowing 2 and sometimes 3 impressions each, depending on the amount of paint applied and how quickly I pressed them onto the paper.

Tempera paint dries really fast, so this becomes a fast paced creative process that’s full of surprises! My niece loved this project. No need to wait for the paint to dry in between impressions – just keep adding to your nature art print until you feel it’s done!

We had a great time exploring with a variety of plants. My nieces favorite leaves to use were from Phlox and Beech Tree. You can create a whole bunch of prints in a short time and then go back later once the paint is dry, and use colored pencils to add detail to the prints that look incomplete. The painted surface proves a nice toothy texture that really grabs the colored pencil making it a very satisfying to draw on. I’ve found even the budget colored pencils work well on this surface.

Once we were done making the prints, we let them dry and then decided to cut the “ugly” ones out and add detail using colored pencil to create a more finished look. By cutting the leaves out, we gained the flexibility to experiment with different placement options to find the perfect composition. I think the contrast of the black background really make the decorative leaves pop!
What kind of plants can you find in your local area to create nature prints from? Have fun experimenting, the possibilities are endless!


Pingback: Coronavirus Activity Guide - 45 Boredom Buster Ideas For Kids - S&S Blog