

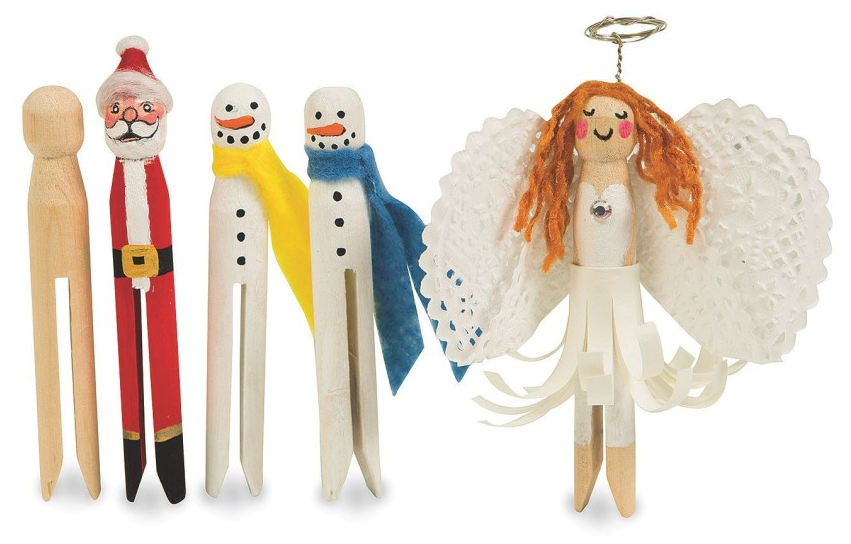
Wooden doll pins are perfect for all kinds of DIY craft activities. They are a great basic, budget friendly craft material to have on hand to make a variety of painted characters. They are the perfect size for ornaments, cute handmade decor and play figurines for all ages. In this tutorial Crafty Kate will explain how to create a range of painted doll pin characters themed for the winter holiday season. The instructions below are conveniently listed in order of difficulty from easy (snowmen) to advanced (angel) so you can customize this fun activity to your groups skill level. These super cute keepsake wood crafts make great collectables for dramatic play, holiday decor, personalized gifts, party favors and more!
Doll Pin Snowman – Easy

Snowman Materials:
- Dolls Pins
- Doll Pin Stands
- White, Black & Orange Acrylic Paint
- Ultra Fine Point Permanent Marker
- Fine Point Brush
- Felt
- Scissors
Snowman Instructions:
1) Base paint all sides of the wooden doll pin with white acrylic paint. Let dry.
2) Next use orange paint to create a little horizontal cone “swoosh” shape as a carrot nose. Let Dry. TIP: I painted a super thin black line using a toothpick along the bottom edge of the carrot nose. Do this to add a shadow and extra dimension.
3) Use a black marker, a fine point brush or even the handle end of the brush to make dots for the coal eyes, mouth and buttons using black acrylic paint. Let Dry.
4) Place painted snowman into the wooden doll pin stand, do this to make adding embellishments easier. Cut a small strip of colorful felt approx 1″ x 6″ long.
5) Match up the cut ends of the felt to create a loop and secure with a tuck and fold around the snowman’s neck as a scarf. Use scissors to cut the scarf to the desired length. You can create angled ends (shown in the picture of the finished sample above) or make small cut close together as fringe on the ends of the scarf.
Doll Pin Santa – Intermediate

Santa Materials:
- Doll Pin
- Doll Pin Stand
- Acrylic paint
- Gold Acrylic Paint
- Paint Brush
- Adhesive Red & White Felt
- Pom Pom
- Scissors
Santa Instructions:
1) Use the image of the finished sample above as reference, and base paint the “body” of the doll pin with red acrylic paint. Let dry.
2) Make a vertical center strip of white paint on the front of Santa’s coat. Let dry.
3) Mix a tiny bit of red and yellow paint on the tip of the brush into a small dollop of white paint and mix until you get the desired rosey tone for his face. Paint the “head” of the doll pin. Let dry.
4) Use a tiny detail paint brush or ultra fine point permanent marker to create a jolly Santa face. Let dry.
5) Use the gold metallic paint to create a belt buckle and trim the top of Santa’s boots. Let dry.
6) Place painted Santa into the wooden doll pin stand, do this to make adding embellishments easier.
7) Cut a 1.5″ x 3″ rectangle of red adhesive felt, remove the paper backing and wrap around the top half Santa’s head as a hat being careful not to cover his face. Once you create a cone shape around the head, stick the felt end to itself on an angle and cut off the excess.
8) Pull apart a white pon pom and roll it between the palm of your hands. Do this to create a smaller little pom pom and glue it to the top of Santa’s hat. Let dry.
9) Last cut a small strip of white felt approx 1/4″ x 2″ or use the excess white pom pom fluff to glue around the brim to complete Santa’s hat. Let dry.
Angel – Advanced

Angel Materials:
- Doll Pin
- Doll Pin Stand
- White Acrylic Paint
- White Heart Doily
- Yarn
- Black and Pink Fine Point Markers
- White Construction Paper 9″ x 12″
- Craft Wire
- Paint Brush
- Adhesive Acrylic Gems
- Scissors
- Tacky Glue
Angel Instructions:
1) Paint the body of the angel with white acrylic paint. to create the top of her dress I painted a white heart to make a sweetheart neckline dress. the unpainted sides of the heart create the angels arms and fill in the back and bottom half of the doll pin “body” with white paint. Let dry.
2) Cut a piece of craft wire approx. 12″ long. Match up the cut ends and twist together and attach to a twisted wire circle to create a halo. Tip: Wrap a 24″ piece of wire around a fat marker (approx the diameter of a nickel) to make a nice circular halo.
3) Wrap stem of the wire halo around the waist of the angel so the halo comes up and over her head as shown in the picture of the finished sample above. TIP: Use a little hot glue to secure the stem of wire halo to the back of the angel’s torso if the wire won’t stay in place.
4) Place the painted angel into the wooden doll pin stand, do this to make adding embellishments easier.
5) Cut a piece of white construction paper 4″ x 9″ and fold horizontally so you have a double layer rectangular strip of paper that measures approx. 2″ x 9″. Hold along the folded edge and make 1 3/4″ vertical cuts about 1/8″ apart across the width of the rectangle, making sure not to cut through the top folded edge.
6) Use a pencil or your fingers to curl the ends of the fringed strips. With the cut strips on the bottom, glue the paper around the waist of the angel to create the bottom of her dress. See the Image of finished sample above for placement.
7) Fold the bottom point of the paper heart doily to meet the center point of the top of the heart and cut out a small triangle from the center of flat bottom edge. Glue the cut and folded doily to the back of the angel’s torso (layering over the stem of her wire halo) as her wings. TIP: If you don’t have paper doilies you can make angel wings with any white paper, rice paper or even a coffee filter.
8) Use the fine point markers or a fine point brush and acrylic paint to create the angels face.
9) Cut a few strips of yarn approx. 3″ in length and unravel the strands. Glue the wavy strands to the top of your angels head as hair. Let dry.
10) Embellish the angels heart center with an adhesive gem for extra sparkle. Without the stand, this cute angel makes a great hanging ornament as well!
Click here for more DIY holiday craft Ideas!


Pingback: Top 10 DIY Christmas Crafts - S&S Blog