


Tie dye is a creative craft that lets you experiment with a wide range of colors and patterns. Using simple materials like string, rubber bands, or zip ties, you can create unique designs with different techniques. Here are some essential tips and techniques to help you achieve bold and vibrant results every time.
How to Be Successful with Tie Dye
Choose the Right Fabric:
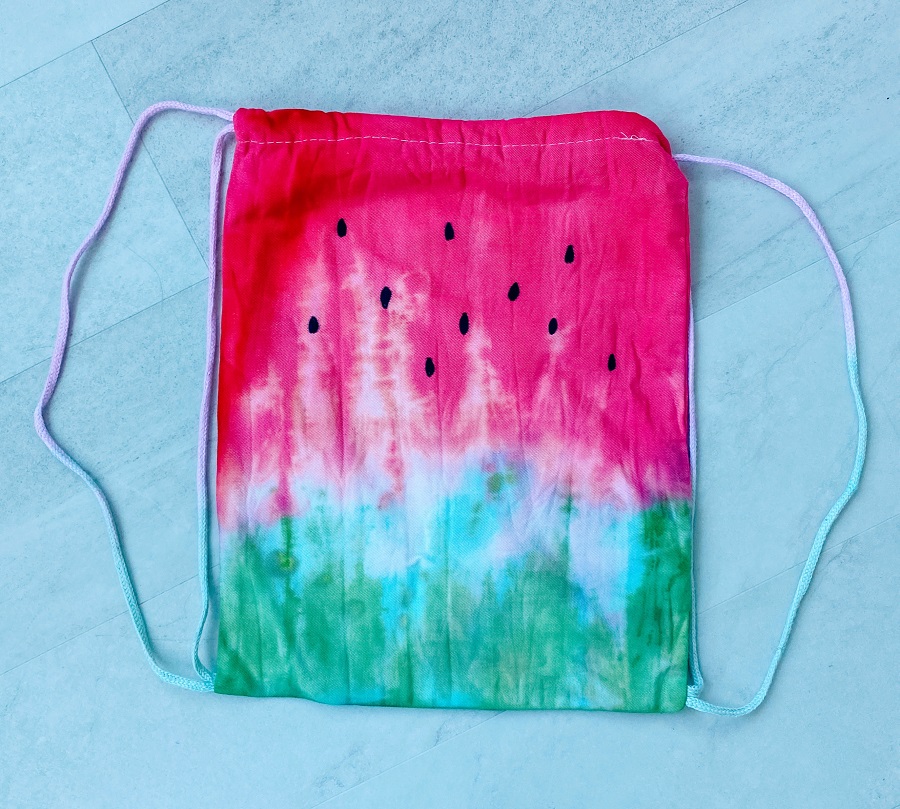
Natural fiber fabrics are the best choice for tie dye because they absorb color well and produce bright, long-lasting results. Cotton shirts are especially popular, but you can also tie dye scarves, bandanas, and draw string bags for a fun project.
Prep Your Materials:
Before you start, wash your fabric to remove any dirt or sizing. This helps the dye soak in evenly. Do not use fabric softener or dryer sheets, as these can leave a residue on the material. You do not need to dry the fabric completely; it should be damp but not dripping when you begin.
Tie Securely:
Wear gloves to protect your hands from the dye. Use rubber bands or other ties to secure the folds tightly. Wet fabric will expand, so it is important to make sure each fold is tied snugly. This helps the dye stay in place and creates clear patterns.
Focus on Color Choice and Saturation:
The two most important factors for a successful tie dye are color choice and color saturation.
To get vibrant colors, use enough dye and think carefully about your color combinations. Squeeze the dye into the folds and press gently to help the color reach all layers of the fabric. When choosing colors, keep the color wheel in mind. Avoid placing opposite colors next to each other, such as red with green, blue with orange, or yellow with purple, as this can create muddy or brown areas.
Once your fabric is prepped and your colors are selected, you are ready to choose your tie dye design or technique. Keep reading for step-by-step guides to some of the most popular patterns.
Video Tutorial
Tie Dye Design Techniques
Vertical/Horizontal Stripes
To create horizontal stripes, fold your fabric into vertical pleats. For vertical stripes, fold the fabric into horizontal pleats. If you want diagonal stripes, simply fold the fabric diagonally. Secure your folds tightly with rubber bands before adding dye for crisp, defined lines.
Bullseye Pattern:
For classic concentric circles, pinch the spot on your fabric where you want the center of the bullseye to be. Pull the fabric upward to form a tube shape, then wrap rubber bands at intervals along the length of the fabric. Each section between the bands will create a ring of color.
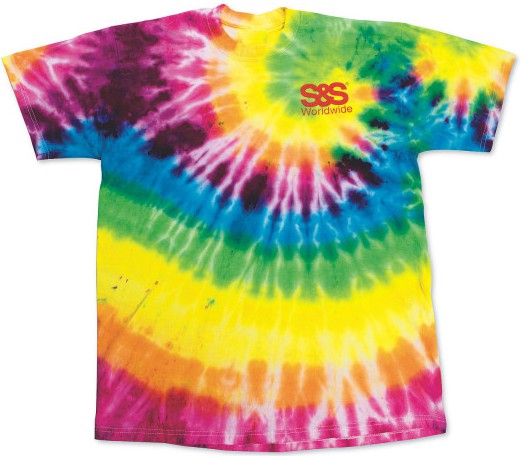
Classic Spiral
Lay your fabric flat and smooth out any wrinkles. Decide where you want the center of your spiral, then pinch that spot and begin twisting the fabric in a circular motion. As the fabric spirals, pleats will form outward from the center. Keep twisting until the entire piece is in a spiral shape, then secure it with several rubber bands crossing over the bundle. This technique creates the iconic swirl pattern.
Circle Patterns
To make random circles of color, pinch small sections of fabric all over your garment and secure each one tightly with a rubber band. After dyeing, these spots will become colorful circles, adding a playful look to your finished piece.

See our Color Splash Easy Tie Dye Kit for even more detailed information on tying tips!
Color Combination Fun:
- A lot of fuchsia and a little yellow make red
- Red and yellow make orange
- Yellow and turquoise make green
- A lot of turquoise plus a little fuchsia makes blue
- Turquoise plus fuchsia makes purple
Now that you have chosen your design, you are ready for the tie dye process!
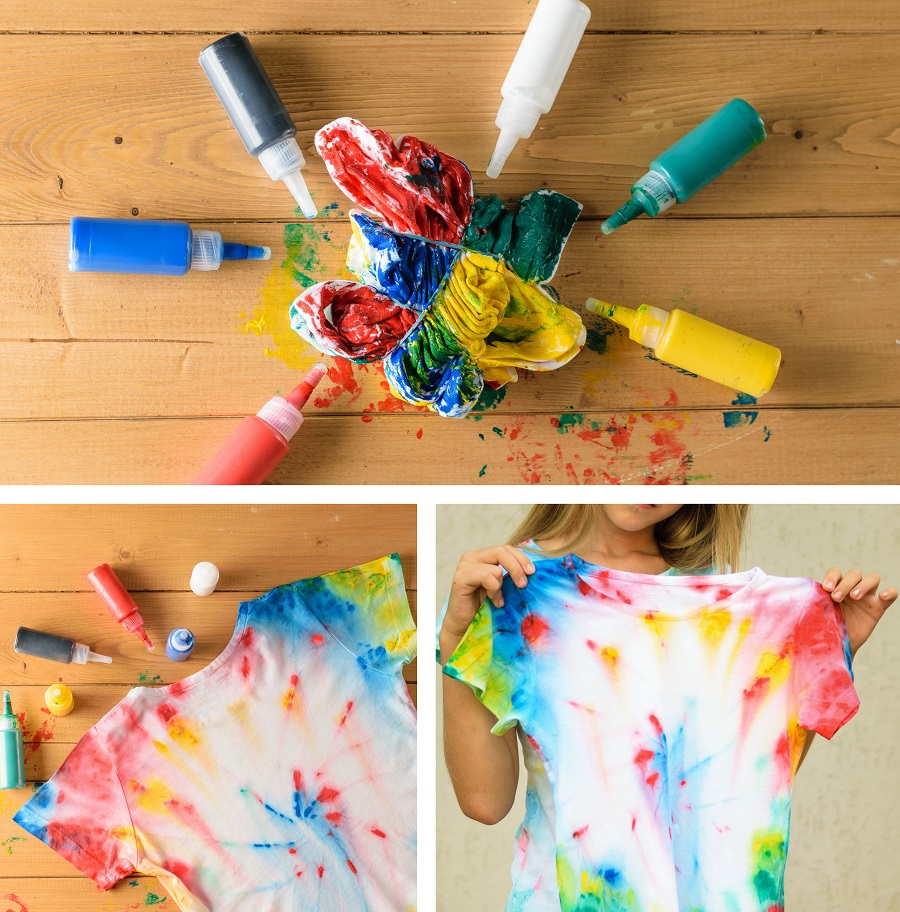
Tie Dye Method #1 – Easy Method
This beginner-friendly method uses our Color Splash Tie Dye Easy Pack, which includes bottles of dye, pre-measured packs of soda ash, and rubber bands. It is perfect for individuals, small groups, or even large events.
Tie Dye Materials:
- Color Splash Tie Dye Easy Pack – Pack of 24 – Makes 50-60 shirts
- Gloves
- Scissors
- Paper Towels
- Plastic Table Cover
- Plastic Bags
- Water
If you are working with a very large group, try our Color Splash® Cold Water Tie-Dye Factory pack that makes over 1500 projects!
Tip: Before folding and tying your project, rinse or soak the fabric in warm water and wring it out so it is damp but not dripping. Damp fabric absorbs dye more evenly and helps create bold, vibrant colors.
Step 1 – Prepare Your Workspace
Cover your work surface with a plastic table cover to protect it from any drips or spills. Tie dye can stain, so make sure the area is fully covered.
Step 2 – Select and Prepare Your Design
Choose your tie dye design technique, such as stripes, bullseye, spiral, or circles. Fold and bind your fabric according to your chosen pattern, using elastic bands to hold the folds tightly in place. For easier folding, tuck the sleeves inside your t-shirt to keep them out of the way!

Step 3 – Mix the Dye
Put on gloves to protect your hands. Carefully cut open the soda ash packets and pour them into the dye bottles. There is no need to pre-soak your cotton garments in soda ash, as the Easy Pack includes pre-measured packets to mix directly with the powdered dye. Avoid breathing in the loose dust.
Step 4 – Add Water and Dissolve the Dye
Fill each bottle with warm water, replace the caps, and shake until all the powdered dye is completely dissolved. For the best results and the brightest colors, use the mixed dye within 48 hours.
Step 5 – Apply the Dye
Place your tied garment on the protected surface. Hold the tip of the dye bottle close to the fabric and gently squeeze dye into the folds, making sure it penetrates all layers. Flip the garment over to dye the other side as well. Use enough dye for rich color, but avoid over-saturating to prevent puddles. Wipe your gloves and work surface with paper towels between colors to keep them clean.
Color Tip: Avoid placing complementary colors next to each other, such as red with green, blue with orange, or yellow with purple, to prevent muddy or brown areas. If you notice small speckles from colors like yellow or green, do not worry – the dye will still produce even coverage!

Step 6 – Work the Dye Into the Fabric
Gently squeeze the dyed areas with your fingers to help the color reach all the way through the folds. Continue wiping your gloves and surface between colors to prevent unwanted mixing.
Step 7 – Remove Excess Dye
Check that your garment is not dripping with excess dye. Place it on a stack of paper towels to absorb any extra liquid before setting it aside.

Step 8 – Set the Dye
Place the dyed garment into a plastic bag and tie it tightly, or use a resealable plastic bag. Keeping the fabric damp helps the dye set. Let it sit undisturbed for 12 to 24 hours for the best results.
Organization Tip: If you are dyeing multiple items, place each in its own labeled bag with the person’s name and the time to wash out.
Step 9 – Rinse the Garment
Put on gloves and remove the garment from the bag. Rinse it under cold running water, one item at a time. Cut the rubber bands and carefully unfold the fabric. Continue rinsing in cold water until the water runs clear, then rinse again in the hottest water available to remove any unreacted dye.
Step 10 – Wash and Dry
Wash the rinsed garments in the washing machine using a warm or hot cycle. Hang or machine dry as desired. For the first few washes, keep your tie dye items separate from other laundry to prevent color transfer.
Have a very large group? Our Color Splash® Cold Water Tie-Dye Factory pack that makes over 1500 projects!
Tie Dye Method #2 – Soda Ash Pre-Soak
Tie Dye Materials:
- Soda Ash
- Powder Dye
- Spray Bottles
- Rubber Bands
- Gloves
- Scissors
- Paper Towels
- Plastic Table Cover
- Plastic Bags
- Water
Step 1 – Prepare the Soda Ash Solution
For this method, where soda ash is not already mixed into the dye, pre-soak your garments in a solution of sodium carbonate (soda ash) for fifteen minutes to one hour. Soda ash helps the dye bond to the fabric and prevents color bleeding. Mix one cup of soda ash per two gallons of water.

Step 2 – Mix the Dye
Add the powder dye to empty squirt or spray bottles first, then add water. Be careful when measuring out the dye. Leave the jars open as briefly as possible, and wear a face mask to avoid inhaling any dye powder.
Step 3 – Dissolve the Dye
Replace the bottle cap and shake until the dye is fully dissolved.
Step 4 – Apply the Dye
For best results, apply the dye to your fabric within 30 minutes of mixing. Use your preferred tie dye technique and follow the earlier steps for folding, tying, and dye application.
Congratulations, you’ve just created your first tie dye item! Share your photos with us so we can see your creations.
Frequently Asked Questions
How long should I let my tie dye set?
For the brightest colors, let your tie dye set for at least 12 to 24 hours. Keeping the fabric damp in a sealed plastic bag helps the dye bond to the fibers.
What is the best way to wash tie dye for the first time?
Rinse the item in cold water until the water runs clear, then wash it separately in warm water with mild detergent. This helps prevent the colors from bleeding onto other clothes.
Can I tie dye things besides t-shirts?
Yes, you can tie dye almost any natural fiber item, like tote bags, socks, pillowcases, or bandanas. Just make sure the fabric is cotton or another natural material for the best results.
Tie dye is all about creativity and having fun. Whether you are making your first shirt or experimenting with new patterns, the process is just as rewarding as the final result. Remember, there are no mistakes in tie dye, every piece is one of a kind! Enjoy your journey to the final product. Share your creations, and let your personality shine through every swirl and splash of color. If you need more supplies or inspiration, check out our full collection of tie dye kits and accessories. Happy crafting!
View all of our great tie dye products here!


Hi,
I’m having a problem with getting the colors right. Even when I put the colors that can go next to one another, it still seems to look off. I’m not sure why, but almost every shirt I do they don’t look right. Do y’all have any ideas or can you tell me something I may be doing wrong? Thank you!
I have used the 2- minute Tie Dye kits that you microwave, and the one step Tulip kits, that you leave for 6 to 8 hours and then rinse.
Can both kits be used like the microwaved ones, or used the other way, where they sit for 6 to 8 hours?
I’m asking this, because I noticed the bottle were exactly the same with the Tulip dyes. I bought more packets of dyes and don’t know if it matters.
Yes, it’s all the same dye. It needs a certain amount of heat to set it. It can either be a quick blast of very hot, or a lower temperature for longer. Keep it as warm as you can though – it needs to be at least 21C/70F to set the dyes properly, especially blues.
Can I rinse my outfit I bought that’s brand new with soda ash to help the colors stay in better???!
Hi Mary, yes this is recommended. In our blog, we added a tip “To help ensure the dye stays on and help preventcolor bleeding, you can pre-soak the fabric for fifteen minutes to one hour in a solution of sodium carbonate (Soda Ash), mixed one cup per 2 gallons of water – unless you are using dyes that have the soda ash pre-mixed in.”
Thanks for the great guide! We learned the hard way not to put opposite colours next to each other – my son thought orange and green was a great combo and it was a disaster.
Thank you for this! I have been trying to dye my clothes by myself for so long, this should help.
For people like me, who haven’t had much success till now, there is SeamsFriendly (www.seamsfriendly.com). These guys have the cutest collection of hand tie-dyed clothes. The fabrics are natural and they use chemical free dyes on clothes. There are so many other Indian Crafts for everyone to choose from.
Once you use soda ash for 15 minutes to an hour do you dry shirts before you add paint? Or are shirts damp before you add paint?
I did. Red and yellow combination after pre soaking in soda ash several times . Each time the red turned to pink and the yellow washed out . What am I doing wrong??
Hi there, you may want to let your fabric sit longer with the dye. This article may help give you some insights: https://www.grateful-dyes.com/blog/red-dye/
Pingback: New Hobbies to Try: Quarantine Edition | Buzz
This is super helpful! I ordered colour catcher sheets to wash with my shirts the first time after dying. By “wash and dry separately for the first few washes” do you mean each individual shirt has to be washed and dried separately, using one sheet per shirt? Or do you mean wash and dry the tie-dye shirts together, but separately from other laundry for the first few times?
I now see your answer to the post just before me, wash each individually. Have you ever used color catchers or heard of it? I hear it will catch the bleeding colors so the white stays white.
I just dyed my fabric and let it sit for at least 8-10 hours, should I wait for it to dry completely before rinsing the fabric off for the first time? or is it okay if it’s still a bit damp. Also after rinsing, can I wash it along with other fabrics that I have just died? or should I wash each of them individually? Lastly for the first was after rinsing out the fabric should I use detergent? or can I put salt in along with it to help the colors soak up more?
Thank you so much!:)
Hi Sandra! You do not have to wait until the fabric dries completely. We recommend waiting 12-24 hours before rinsing. So it can still be damp. After rinsing, it is best to wash each individually – otherwise, you may risk some of the dye getting on your other designs and changing the colors. You can use soap as you normally would!
Love all these! Quick question- we just did a bulls eye design on a bag and somehow we missed a big spot so in the middle of pattern is a big white glob- so would u suggest just putting some color on that spot or tying it back just like it was and then put the right colors where they go in hopes to fix the design., basically question is how would you suggest going back to fill in the blanks that u missed .. we have not washed it yet so I’m hoping that is in our favor
Hi Hannah, yes that is great you have not washed it yet. If you missed a pretty big spot, I would recommend tying it back up again like you did originally so that the color is in the right places to follow your design, and soaks into the shirt as it is tied up. Then follow the same steps as if you were doing it the first time. I hope it comes out well! We would love to see some finished photos if you’d like to share them and have them featured on the blog!
Hi! I’ve seen people hang their shirts on a clothes line to spray off, which seems to work well, I’ve noticed when I do this that the colors fade. I thought air drying them outside before washing would help the color last, do you think this is probably why my colors get pale?
I have tie dyed some tshirts, removed the elastic bands and left them to dry but i didnt use soda ash and i dont have any soda ash! If i wash or rinse the tshirts will the dye come out?
Hi Martha! Soda ash helps the dye adhere to the cotton in the shirts, and it gives you brighter colors. If you don’t have soda ash, you can use salt as an alternative. When you rinsed the shirt after dying, did all of the color run out?
Hi we wanted to dye a white hoodie with pink, purple & orange dye. We did the swirl spiral pattern but we washed it in the washing machine after rinsing in cold water first- and the whole white hoodie is now a pretty pink colour (with the coloured tye dye pattern too). What made the white hoodie turn pink? Thanks for any help.
I love to tie dye. This is so step by step it almost seems easy.
Pingback: How to Tie Dye ANYTHING Without a Huge Mess •
I read somewhere to leave the rubber bands/ties on the garment until the first wash is done before removing them. Is that true?
can I add more tie dye colors to an already dyed shirt?
Hi Jill, Yes, you most certainly can!! Thank you!
It’s really good blog. I like It!
Thank you so much!
thanks for the information
I’ve been using soda ash but the fabric Fade what do I do to keep the colors brighter?
The longer I let the dye sit in the fabric the brighter the colors. We let ours sit for a week rinse out then was in cold with a cap of white vinegar.
Wonderful information. The designs shared here are just awesome. Thank you for the tutorial. Helps a lot.
Do I have to to soak the shirt in salt water before dyeing?
Great blog! Is it possible to store mixed dye if you made too much? Or does it lose quality/strenght over time?
Great blog! is there anything other videos on tie dye t- shirts? that was amazing.
I bought a store kit before I saw this post. My kindergarteners and pre k er had a great time doing shirts for spirit week. But the very first time I washed the t-shirts they faded a lot. After sitting in bags for 6-9 hours I rinsed in cool water till ran clear. At this point the colors were bright. Then washed in cold water with tide. Now faded like last year’s shirts. Any ideas?
Hi Maria, we would suggest you leave the shirts in the plastic bags to sit over night or at least 12 hours. Also what dye did you use? Did it have soda ash? That is an important step to keeping the colors bright, sometimes it’s already in the dye and others you need to buy it separately and soak the shirts ahead of time.
You gott a get good dye like Procion if tou want bright colors. Rit just fades out.
that’s so cool
Awsome Blog
Pingback: Top 10 DIY Craft Blog Posts from 2017 - S&S Blog
Nice anf informative article. Thanks for sharing the tips with us. Learned a lot of things.
How do you tell if the dye already has soda ash in it or if you have to get it separately? Where do you buy soda ash?
Hi Carol! Many tie dye kits come with soda ash, for example our Color Splash!® Easy Tie-Dye Kit that we mention in the blog post comes with 6 packets of it. If you need to buy it separately, here is the link on our website: http://www.ssww.com/item/soda-ash-dye-fixer-FA3249/. Let me know if you have any other questions!
I have also found that if you rinse and squeeze your item under cold running water with the rubber bands still securing your shirt, this will rinse a lot of the excess dye away before it has a chance to get on the white parts of the shirt. I usually rinse until I don’t see very much color coming off when I squeeze the water out, and then I remove the rubber bands or ties and rise a few more times. It also helps, if you are doing a large batch of shirts, to only wash a few at a time – there will be less loose die in the water to re-attach to the un-dyed parts of your fabric.
Pingback: DMCI Homes Communities | Weekend Condo Project: How to Revive Your Closet with Natural Dyes
Pingback: A Dandy Bouquet for Mother's Day! - S&S Blog
My grade level team just did blue and red tie dye and the red ran and now the white is pink, is the above reply the only way to prevent the red from running? I read something about vinager.
you might have used too much dye. after a thorough cold water rinsing and a hot water rinsing, they should be immediately washed in a washing machine with synthropol. it keeps excess dye particles suspended in the water and helps remove any dye that runs during the rinsing process.
My mom used to help us tie dye shirts as children and I would love to provide this entertainment to my kids as well. Thanks for the fun tips. I remember the classic spiral method being successful. Another thing to think about would be ensuring that all needed materials are present before starting the project.
It’s going to be my first time doing this. Now I have powder dye blue light blue and liquid dye as well. Do they have soda ash in them ? It’s a baby shower and tye dye is awesome! So it has to sit up to 24 hours before rising off.please what dye would you suggest to be the best to use in tye dye. Thank you Molly Margaret Los Angeles California
Pingback: 8 Back to School Themed Activities For Senior Residents - S&S Blog
No matter how much cold water rinsing I do after 24 hrs of dye setting, the whites do NOT stay white, but pick up some of the red, usually, and the whites are now a dull pink.
Frustrated!!!
Hi Mike, are you soaking the items? That could be why the red dye is getting onto the white areas. You want to be sure you are rinsing the items under running water. I usually rinse in the bathtub so I can hold the items under the faucet. It can take a while to rinse clear but you will want to hold the item under the running water, then squeeze the water out and continue this until the water squeezes out completely clear. Let me know if this helps!
my shirts are turning pink in the white areas as well!! im starting to get frustrated as well.
you might have used too much dye. after a thorough cold water rinsing and a hot water rinsing, they should be immediately washed in a washing machine with synthropol. it keeps excess dye particles suspended in the water and helps remove any dye that runs during the rinsing process.
I have done the same thing! I washed with cold and hot water under the faucet and waited until the water appeared clear, then I put it in the dryer and my white parts of my shirt turned a little pink ish purple. Does anyone have any ideas if it is possible to take out the color from the white parts without having to strip all the color from the tie dye?
Pingback: Tie Dye Bandana Craft for National Dog Day - S&S Blog
Pingback: Design Your Own Pet Leash & Collar - S&S Blog