These wooden bangle bracelets are one of our favorite crafts, especially for summer camp! You can be creative and match your own style, and there are so many options for decorating. These can be for both kids and adults. Pick your favorite designs from the photo and learn how to make them! See the instructions below for each.
Material Options:
- Wooden Bangle Bracelets
- Acrylic Paint
- Gems
- Trim
- Jute
- Yarn
- Stickers
- Mod Podge
- Aleene’s Tacky Glue
- Glue Dots

Instructions: Paint both the inside and outside of the bracelet with white acrylic paint. Two coats of paint is recommended to cover the wood. Let it dry. Choose the colors you’d like to use for your bracelet. I chose orange, red, blue, and yellow. Dip a pencil eraser into one color at a time and make dots all around the outside of the bracelet. Repeat as many times as you’d like with your colors. Let it dry. Paint Mod Podge over the entire outside to create a glossy look.

Instructions: Paint the inside of the bracelet with blue acrylic paint. Then draw out your design with pencil. Paint half of the bracelet with blue paint and the other half with green, keeping your design in mind as you paint. Let it dry. Now paint the design with white acrylic paint. Some of the green and blue will show through. Let it dry, then paint over the white with gold. Outline with black marker to accent the designs. Add glitter glue to the entire outside of the bracelet. Then Mod Podge it for a glossy look.

Instructions: This one is great for a galaxy theme! Paint the entire inside and outside of the bracelet black. Let it dry. Put star stickers around the outside of the bracelet. Now sponge paint a mixture of metallic silver and purple acrylic paint. Let that dry, then peel the star stickers off. The stars will show up black. Then use a paintbrush to apply glitter, and Mod Podge to seal it.

Instructions: Choose 2 different colors of yarn for your bracelet. I chose pink and gold to match the outfit I was wearing. Cut 2 pieces of string per color, each 6.5 feet long. Tie the first piece of string to the bracelet in a double knot. Be sure the knot part stays on the inside of the bracelet. Wrap the string around the bracelet, making sure it is tight. When you get to the end of the first string color, tie the next string to it. Then wrap that around the bracelet, and so on until the entire bracelet is covered. Cut off any excess string that might be hanging off. TIP: When wrapping the string around the bracelet, wrap the end you aren’t using around your finger so it is easier to thread through the bracelet hole. NOTE: We also now have a yarn bangle bracelet kit, which comes with 12 bracelets and colorful yarn!

Instructions: Paint the inside and outside of the bracelet. I chose to make a dark magenta color by mixing blue and pink acrylic paint. Let it dry completely. Then wrap trim around the bracelet. You will need 5 pieces total. Once you get to the end of the first piece, use glue dots to glue it to the bracelet. These work really great. Repeat until the bracelet is covered! I chose to leave some space so you could see the paint color through it.

Instructions: Here is another bracelet made using trim. You can choose to paint the inside of the bracelet if you’d like. Then wrap the trim around the bracelet, and glue it with either glue dots or tacky glue. For this method you won’t have any string or trim inside of the bracelet.

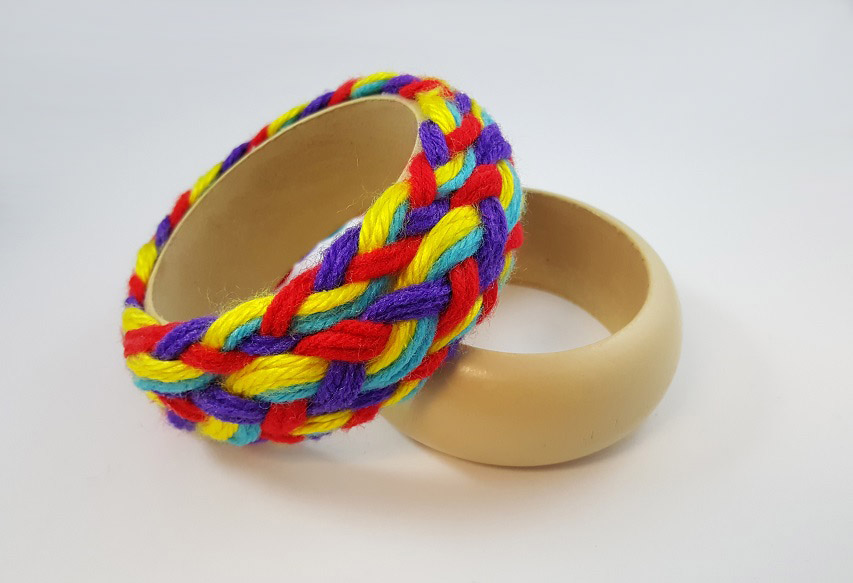
Instructions: Choose some colors of yarn you’d like to use for the bracelet. I chose red, purple, yellow, and blue. Braid 2 or 3 strands of each color together, then wrap it around the bracelet and glue it with tacky glue. You can also paint the bracelet if you’d like, just make sure you do that first.

Instructions: This is one of our favorites! Paint the inside and outside of the bracelet blue. Then use these sticky gem strips to cover the whole outside. Start at the inner most corner and wrap the strip as straight as possible around the bracelet. It will only reach about halfway. Then place another strip right after it. Repeat until you have about 7 rows of gems. You will need to rip some of the gems off each strip to make it fit. Also you may need to rip off just one or two gems to fill in gaps. Watch it shimmer in the light and pick up all of the colors around it!

Instructions: Cut a piece of jute about 14 feet long. Starting at the edge of the bracelet, squeeze a good amount of tacky glue onto the surface, going around a few times so about half is covered with glue. Place the end of the jute string as close to the edge of the bracelet as you can and wrap it along the glue, leaving no spaces. It can get a bit messy, you’ll get quite a bit of glue on your hands but the jute sticks really well to the tacky glue. Then add glue to the other half of the bracelet and keep wrapping the jute. Let it dry. Paint liquid watercolor over the jute, then let it dry. Now apply Mod Podge to seal it. NOTE: If you can wrap the jute quick enough, you can just paint a thick coat of glue over the whole surface of the bracelet.
Let us know which bracelet is your favorite!


Pingback: 7 Supplies Every Activity Director Needs to Keep on Hand - S&S Blog
All collections are so pretty. Thanks for this posting. I really liked reading this blog. Keep sharing like this.
These wooden bangles are really amazing. I really love them all. They are all looking pretty.
This blog is really very interesting. I am waiting for your next post. keep on sharing this kind of post.
again need to know if you have kits for these bracelets craft
Hi again Teresa, so great to see you are interested in our crafts! We do have a yarn bracelet craft kit: http://www.ssww.com/item/yarn-bangle-bracelet-GP3282/ which comes with 12 wooden bracelets and colorful yarn. If you want to make the bracelets you see in the blog post, you can choose your favorites and pick which materials we made them with. Most of them are decorated with acrylic paint, decorative trim, or gems which are all linked in the post.