


My 10 year old daughter came home after being at her friend’s house with some sensory balls that she made herself. I thought it was a really cool concept, and asked if she could teach me how to make them! So we turned this idea into a weekend STEAM project. These sensory balls were fun to make, plus they were educational! This project can go in a number of directions with different color polymer beads, balloon sizes, and amount of water.
Materials:
- Multi-colored polymer beads (slippery spheres)
- Glow in the dark polymer beads
- Clear balloons
- Sorting bowls
- Water
- Water bottle
*you can also use these giant fish eggs or Orbeez if the polymer beads are unavailable.
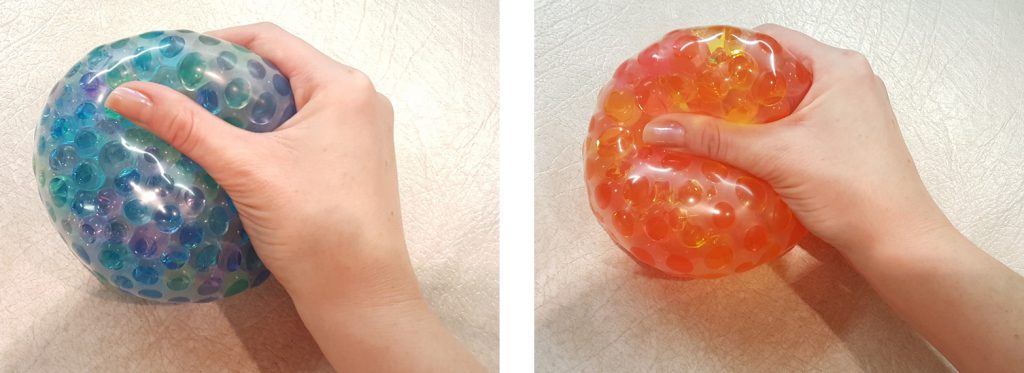
Step 1: Fill a bowl with water and add polymer beads. We used about a tablespoon for each color, which ended up making 4 sensory balls. The beads will start to absorb the water within 15 minutes and will be full grown within a few hours.

Step 2: Pour the fully grown beads into a water bottle. We found that if you fill the 16.9 oz bottle with beads, you get the perfect size stress ball! Then fill the bottle about halfway with water. This will keep the beads moist when they are inside the balloon.
Step 3: Blow up the balloon about halfway. Hold the air in with one hand, and stretch the end of the balloon over the top of the water bottle with the other hand. TIP: It helps to have another person hold the water bottle in place!

Step 4: Squeeze the water bottle to get the beads inside of the balloon. This step is really fun! They fall perfectly into the balloon, along with the water. It also makes a pretty cool sound, adding to the sensory experience!

Step 5: Let some air and water out of the balloon until you are happy with the shape and size. Be sure to keep enough water inside so the beads won’t dry out. Then tie the balloon.
Squeeze the balloon and enjoy your DIY sensory ball!

Experimenting with Sensory Balls
After we practiced making a few sensory balls, we started to experiment! First we tried glow in the dark polymer beads. It was fun to see the balloon glow, and really added to the sensory impact. We also experimented with different amounts of water. Using measuring spoons, we put 6 different amounts of polymer beads into water and let them grow. The smallest amount used was 1/4 teaspoon and the most beads used was 1 tablespoon. It was fun to see how the different number of beads affected the size and the look of the balloons.
Have fun with colors! The slippery spheres kit comes with 5 different color packets: red, yellow, blue, green, and purple. But when you add water and the beads grow, you will find there are different shades of each which was very cool. We created a few multicolor sensory balls which were our favorite. Then we separated out the pastel colors (blue, purple, green) so pink and yellow were left. Here is what they each looked like:
Another great thing about this project is the water in the balloons doesn’t evaporate, so the beads stay fully grown, making the stress balls last forever! You can also add artwork to your stress ball by coloring with permanent markers or using fun colored balloons. This project can also work with kinetic sand or flour. My daughter brought one of these home too, so it was fun to compare. You can also try using coloful balloons for a less visual and more tactile sensory project.
Questions to Ask:
- Which amount of beads works the best for you?
- What happens if you add food coloring to the water?
- What happens when you add more water? Is it easier or harder to squeeze?
- Which colors provide the best sensory experience for you?
- What is the difference between using beads and kinetic sand? How about flour?
When you apply a lot of pressure to the sensory balls, the polymer beads do crush fairly easily. You can use this as another sensory experience. Have kids crush each of the polymer beads inside the balloon. Then ask them describe the difference of how it feels.

Check out these photos and feedback on Pinterest from others who have tried this activity and loved it! If you try it, we’d love to get your feedback and see photos of your finished sensory project.


|

|

|


Pingback: 15 DIY Stress Ball Ideas For Relaxation Anywhere - DIYnCrafty
Pingback: Paige’s pick of the day! – Family Matters
Yes children too need stress balls as much as adults to balance their minds. You can check a huge range of collection of stress balls .
Pingback: Sensory Balls - DIY STEAM Activity - S&S Blog - Blog first home decor
Very neat idea. Thank for the article.
Pingback: 7 Supplies Every Activity Director Needs to Keep on Hand - S&S Blog
Tried with clear balloons and latex gloves. Both broke but doubling the gloves worked great. Next, I’ll double the balloons. I have 25 5 thru 12 yr olds in the afternoon at a daycare. Hard to say who likes them more; kids or the teachers. Great project.
Pingback: Diy, home decor, teen, crafts, beauty, projects, oragnization, clothes, art, eas... - BestDiyCrafts.Site
Hello. Thanks for the great idea. Are those the orbeez type beads or something else?
Hi Jackie, yes they are polymer beads which are just like orbeez. We used to sell these but have been looking for a new supplier. Hopefully we will have them in stock soon!
These are so awesome, my 10 year old is gonna love them! Such an easy concept and you see these toys everywhere now. Thank you for a DIY version!
Pingback: Fais le toi même – Balle Sensorielle Avec Balloon – DIY | Fais-le toi-même - #Diy #Fais #le #toi #même #Fete #d'anniversaire #arte #creative #faire #faite #bijoux
Pingback: Top 10 DIY Craft Blog Posts from 2017 - S&S Blog
This is a cool idea but, I am afraid that the ballon will burst in less than a day of using it.
Any suggestions???
Hi there, I definitely understand your worries about the balloon breaking! They do hold up pretty well to continuous use, but it can happen if kids are really rough on them. We have had some customers suggest doubling up the balloon, and other say to just make sure they play with them over a storage containter in case it breaks and the beads fall out. Most of the water does evaporate so it won’t be pouring out if it breaks. Also the polymer beads come in a pack and so do the balloons, so you can make several of them at once in case a few break!
They actually make balloons that are just for this they do not pop
Where do you find these balloons that don’t pop?
Any idea about how to get stress balls?
As long as there is some water in there, they shouldn’t break, but the best I have used is the punch balloon ones, cut down to size. Nit clear, but you can always double them up, if you feel they may break when used.
Thanks for sharing Liz!
Great and interesting DIY project. I’m thinking of doing this one with the kids next weekend. Thanks for this! 🙂
Pingback: How to Make Slime - A Safer Recipe for Kids - S&S Blog
Pingback: DIY Sensory Balls– a STEAM Activity – DIYFix.org
Haven’t tried this, but I wonder if there is a way to insert one balloon inside another before inflating. I’ve seen that approach with squeeze balls made from cornstarch filled balloons. Any thoughts on this?
I am an In-Home Therapist and I can tell you that it is great to do so. After much squeezing and stretching, tiny holes begin to form. Doubling up helps it to last longer for sure!!
I would love to make these with my kids, especially my youngest who we think might have some ADD/ADHD issues. This could be a great focusing aid for her. My issue is, I’m allergic to latex, which means I can’t handle them or blow them up. Is there something I could use in place of the balloon, or is this going to need to be a daddy-daughter play thing?
Hi Dollie, great to hear you like this activity idea, but sorry to hear about your allergy! I checked our website and unfortunately we do not have any latex balloons in the smaller sizes as of right now, but I can recommend it to our Product Managers and keep you posted. You may be able to find them at another store though. Or, if you do a search for “Sensory Ball Without Balloons” there are a few different activities, they are just a little more messy.
You could try latex free gloves and double or possibly triple layer the gloves.
Look up “wubble” balloon balls. I think they’re silicone and much much stronger.
As a therapist I often use freezer grade Ziploc bags for my latex-free homes. What we do is we fill up the baggies with the sensory balls or hair gel and pom-poms etc. We seal them up and then make a square frame around them. You can buy all kinds of fun print duct tape. And you essentially put it on one side and fold it over so it could never be unzipped again. Best of luck!! They are great for desks, laps, car rides!!!
Could you use latex-free surgical gloves!?
Excellent idea!
We made these at our facility, they are really fun BUT it’s not so fun when the balloon breaks!
Hi Mindi, you are right that if the balloons break, the beads do go everywhere! We added a note in the blog to be careful not to squeeze too hard since they can break with too much pressure.
Double the balloon might help
The best, you got to try it!