

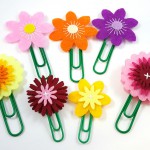
 These colorful tissue paper flowers can hang from the walls, ceiling, or they can be centerpieces. Great for parties of any occasion. You can use any colors to compliment your theme. Learn how to make this fun craft for National Craft Month! Flowers also make a great craft for Spring and Mother’s Day.
Materials: (makes one flower approm.15 minutes)
- Tissue Paper – 12 pink sheets of tissue paper 20″ x 30″ (the S&S value pack has three different shades of pink which adds texture to the finished product)
- Scissors (heavy duty is best)
- Yarn (1 piece at least 12″ long)
Step 1: Stack all 12 sheets of tissue paper on top of each other.
Step 2: Fold all the sheets together (width-wise) in 1 inch increments, like an accordion. Be sure to fold the paper on a hard surface so that it will crease easier. Although you should try to fold each 1 inch row to be the same size, do not worry too much if each row varies slightly. It will not make a noticeable difference to the finished product.

Step 3: Take the string and tie the tissue paper accordion together in the middle. Tie a knot at the end of the remaining string so that you can easily hang the finished product on a hook or pin in the wall.

Step 4: Cut the ends of the tissue paper accordion to make the “petals”. It is easiest on your scissors and your hands if you only cut a few of the paper folds at a time.

Step 5: Carefully pull each piece of tissue paper away from the center. Be gentle so you do not rip the paper. Once all of the petals are spaced out, fluff the flower so that it is round from every angle you view it.


Personalize your Tissue Paper Flowers by using different colored tissue paper, cutting the petals into points instead of rounded ends, starting with smaller sheets of tissue paper!
Here are some other color variations:


Craft submitted by Katelynn E. King from Alexandria, VA


Pingback: 7 Supplies Every Activity Director Needs to Keep on Hand - S&S Blog
Pingback: 8 DIY Mother's Day Home Decor Craft Ideas - S&S Blog