

 Create a Quilt Mosaic craft using a reproducible quilt block template, sheets of squares and triangle paper shapes in assorted colors and patterns. Allow crafters to explore the beauty of quilt-making through the patterns and mosaic pieces. Encourage coordinated color themes, or allow students to create a patchwork ‘crazy quilt’ on their own!
Project benefits include hand-eye coordination, patterning, the introduction of the concepts of geometry, and the development of fine motor skills. Broader benefits include the exploration of history, nostalgia and inter-generational activities.
If you are looking for a way to incorporate history, math and geometry into a hands-on lesson, this is a great activity for your classroom or afterschool program! Introducing your group to mosaics, and the different ways you can use shapes to create, will also allow for a diverse craft program in the future. Our customers have also used this project with their assisted living residents, and they enjoyed choosing their patterns and experimenting with squares, triangles, and squares in their designs.
Quilt Square Mosaics also make a perfect art project for Senior Centers and Senior Living Facilities
How to Make a Quilt Mosaic
Materials:
- Quilt Mosaic template
- Sheets of paper to cut squares and triangles:
- Glue sticks or white glue
1. Find quilt block design templates that can be re-used. Photocopy the quilt template you want to use, and then just trim off the extra paper.

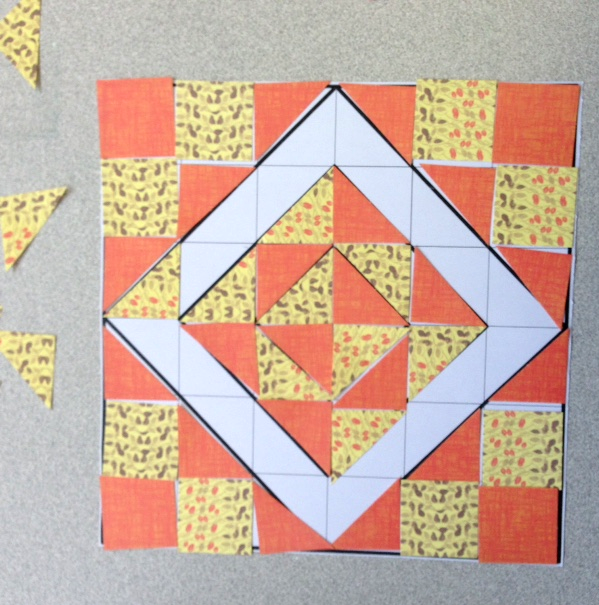
2. Select some of the colors and patterns from the paper shapes. You can choose any color pattern you’d like. Plan out your design by laying the paper shapes on the template. I chose orange and a yellow with a leaf pattern. About partway through, I decided I wanted more contrast in the design so I added blue. I kept experimenting with the pattern until I created something I liked. A classroom teacher can use this project to talk about angles, squares and triangles, patterns and color. You could also discuss some of the information about the history of quilting, which is included in the instruction guide.
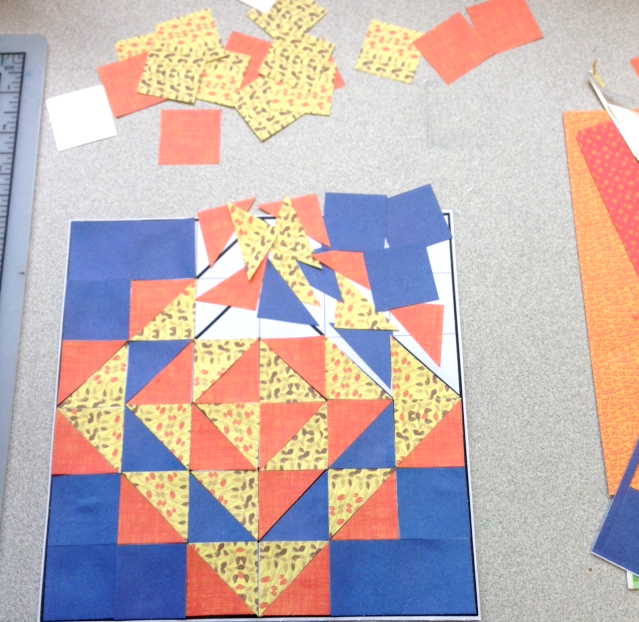
3. Once you are happy with your design, glue down the pieces using either white glue or glue stick. Start with the pieces in the lower left corner and work your way up and over the design. We recommend using either white glue or glue sticks to adhere the paper mosaic pieces. TIP: Once the pieces are glued down, press the entire quilt square down under some books.

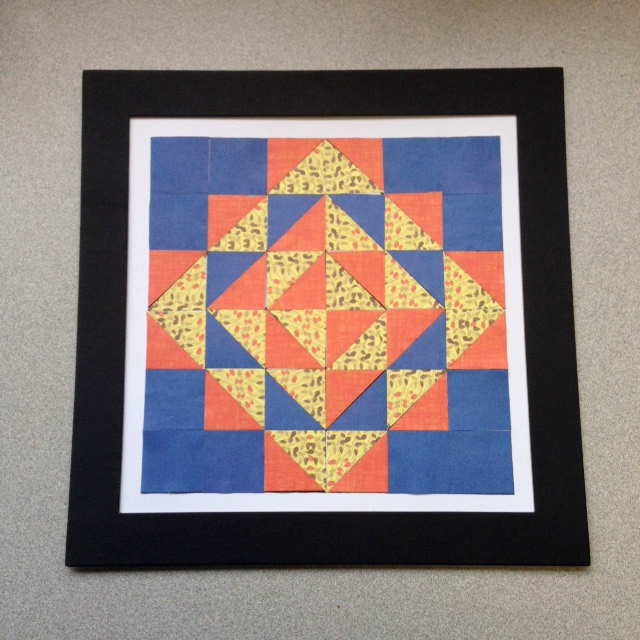
4. Our finished design is 8″x8″. Add a frame as a nice finishing touch! I decided to glue it to a larger sheet of cardstock and then framed it with a black fabric frame I had on hand. You can also use construction paper or poster board. Then using a soft gold colored pencil, I outlined some of the shapes to make them pop with a little gold color!
With the different quilt block designs and the assorted colors and patterns of paper shapes, there are many ways to create unique projects with this kit! It was simple, relaxing and I love the finished project!
Group Ideas
Talk about the utilitarian need for ‘crazy quilts’ made from leftover fabric and old clothing by our pioneers, as well as the artistry of creating colorful patterns on the quilt blocks.
Make a giant patchwork quilt by affixing all the quilt blocks to a wall in a pattern, creating a classroom art project!
Consider inviting a quilter to speak to the group about the art of quilting to encourage the exploration of history and intergenerational play. Students might bring examples of quilts from home that were done by grandmothers or great-grandmothers long ago.
Highlight different quilt block patterns. Consider laminating the poster and changing the quilt block patterns regularly for an ever-evolving work of art. Re-create the poster to reflect seasons (red / green blocks at Christmas for example), or match the block patterns selected and created by individual students.
History of Quilting
The art of quilting can be traced throughout the history of North America and Europe, and in fact may date back to ancient Egypt (around 3500 BC). Because fabric is delicate, it has not withstood the centuries. Ancient examples of quilts only exist in other forms of art, such as carvings or sculptures.
The origin of the term ‘quilt’ comes from a Latin word that means ‘stuffed sack.’ A quilt is quite literally a bedcovering stitched in three layers. The top is typically the decorative patchwork pattern we recognize. The bottom, or ‘back,’ is often a neutral solid color. The ‘stuffing’ in the middle is what makes a quilt a warm and cozy covering for beds! The stitching of the layers can be as artful as the piecing of the blocks, and it is the stitching that keeps the three layers together. Throughout history and all parts of the world, people have stitched together padding and fabric for warm bedding and clothing.
The Industrial Revolution of the late 18th and early 19th centuries fueled the practical art of quilt making. The textile industry blossomed. Commercially-made fabric was affordable and readily available to most families. Women no longer needed to spin and weave their own fabric to clothe their families. By 1840, the piecing of fabric to create beautiful patchwork quilts had become as much an art form as a practical household need. Quilting remains a popular hobby and an artful expression even today!


since you no longer have this kit/craft can you suggest another suppler?
Hi there, I will check with the product manager to see if there is a supplier for this. Although we don’t carry the kit anymore, we left the blog post up in case someone wanted to turn this into a DIY project.
Thank you for your help. I was able to find the website earlier and order what I needed.
how do we order this kit?
Hi Lori, here is the link to this kit https://www.ssww.com/item/quilt-square-mosaic-GP3246/. Let me know if you have any other questions!